How to Draw Perfect Demand and Supply Zones: The Zero-Confusion Guide for Smart Traders
If you want consistent market entries with high probability, you must learn How to Draw Perfect Demand and Supply Zones. Smart traders know this secret: price doesn’t move randomly — it reacts to institutional footprints hidden inside demand and supply zones. Missing them means missing the biggest opportunities.
This guide reveals the exact method How to Draw Perfect Demand and Supply Zones with clarity and precision. Don’t miss this insight — it can transform your chart reading and your trading profits.

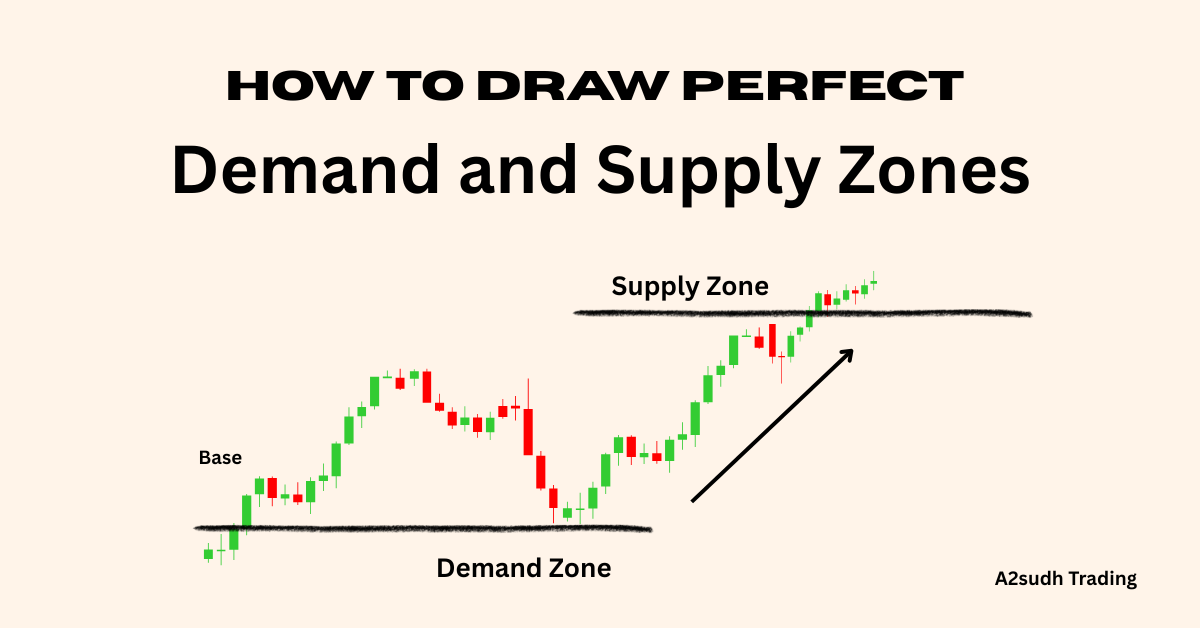
What Are Demand and Supply Zones Really?
Demand zones represent institutional buying areas.
Supply zones represent institutional selling areas.
When price revisits these zones, strong reactions often follow. That’s why understanding How to Draw Perfect Demand and Supply Zones becomes a game-changing skill.
Smart Traders Ask: Why Does Price Reverse From These Zones?
Because big players:
- Accumulate positions at demand zones
- Distribute positions at supply zones
- Leave pending orders behind that trigger future reactions
So, the more precise your zone, the stronger the entry — and the bigger the move.
How to Draw Perfect Demand and Supply Zones
Step-by-Step
Step 1: Identify Impulsive Move
Look for a strong move away from a base/candle cluster.
This impulsive move proves institutions acted there.
Step 2: Mark the Base
This base contains the real zone. It includes:
- Last bullish candle before a strong bearish move (supply zone)
- Last bearish candle before a strong bullish move (demand zone)
This is the “origin of power”.
Step 3: Draw Zone Boundaries
For the demand zone:
- Top: Open of the bullish candle
- Bottom: Wick of the bearish candle before the burst move
For the supply zone:
- Top: Wick of the bullish candle before the fall
- Bottom: Open of the bearish candle
Accuracy in boundaries = perfect entries.
Step 4: Confirm Strength of Zone
A strong zone includes:
- Sharp breakout candle with large body
- Above-average volume
- Fast movement away (no slow grind)
If price stays too long, the zone is weak.
Best Timeframes to Draw Perfect Zones
- Swing traders: 4H / Daily zones for trend direction
- Intraday traders: 15M / 5M refinement entries
Start big → refine small. Precision wins.
How to Trade Using Demand and Supply Zones
Use zones as:
- Reversal points
- Trend continuation setups
- Break-and-retest opportunities
Smart entry:
- Wait for price to tap zone → look for rejection candle
- Add confluence (trend, volume, RSI or EMA)
Increase probability.
Reduce randomness.
Common Mistakes Traders Make
Avoid these:
- Drawing zones too wide (weak accuracy)
- Trading every zone (select only strong imbalance zones)
- Ignoring market trend
- Buying in supply, selling in demand (opposite logic)
Your goal: trade with institutions, not against them.
Quick Actionable Tips
- Use fresh zones — untested zones give strongest reaction
- Align zone with overall structure (HH-HL for demand)
- Avoid zones in choppy markets — wait for clean impulses
- Use partial profits near previous highs/lows
Profit Angle and Risk Management
Knowing How to Draw Perfect Demand and Supply Zones not only sharpens analysis but also:
- Improves reward-to-risk ratio dramatically
- Reduces emotional trading
- Helps you place stop-loss smartly
- Avoids unnecessary trades
Trade with logic. Not hope.
Final Thought:
Master the Zones, Master the Market
If you master How to Draw Perfect Demand and Supply Zones, you master market turning points. Institutions leave evidence — your job is to read it accurately. The more you practice these techniques, the more confident and profitable you become.
Sharp entries. Minimal risks. Maximum confidence.
That is the power of perfectly drawn demand and supply zones.
People Also Ask…
How long does a demand or supply zone stay valid?
As long as price has not consumed the orders inside the zone (multiple retests weaken it).
Which indicator confirms zones?
Price Action is primary — volume and EMAs increase probability.
Can zones fail?
Yes. That’s why set stop-loss outside zone edges to minimize risk.


